2019年7月31日 星期三
2019年7月30日 星期二
抹茶戚風 Bosch 8 series
底部不盡完美,但口感很好,濕潤,森半綠藻粉味道挺好。 |
【蛋白霜・Meringue】
- 蛋白・Egg White:3 個 (median size egg)
- 海藻糖・Trehalose:45g
【蛋黃糊・Egg Yolk Batter】
- 蛋黃・Egg Yolk:3 個
- 三溫糖・Sugar:25g
- 水・Water:30g
- 葡萄籽油・Grapeseed Oil:30g
- 低筋麵粉・Cake Flour:60g
【抹茶醬・ Matcha Paste】
- 森半綠藻粉・Matcha Powder:15g
- 水・Water:45g
【烤程・Baking】Bosch 8 Series Oven・層二
- 上下火功能預熱至 190 度C。
- 放入蛋糕糊後,降溫至 180 度,先烤 10 分鐘,取出畫線(可省略)。
- 再降溫至 170 度,再續烤 15 分鐘左右。
2019年7月17日 星期三
伯爵紅茶戚風蛋糕 Earl Grey Chiffon Cake
Tastes better after one night in refrigerator (cake should be covered). |
【蛋白霜・Meringue】
- 蛋白・Egg White:3 個 (median size egg)
- 海藻糖・Trehalose:46g
【蛋黃糊・Egg Yolk Batter】
- 蛋黃・Egg Yolk:3 個
- 上白糖・Sugar:24g
- 水・Water:30g
- 油・Grapeseed Oil:30g
- 低筋麵粉・Cake Flour:60g
【紅茶醬・Earl Grey Paste】
- 伯爵紅茶粉・Earl Grey Powder:15g
- 水・Water:45g
【烤程・Baking】Bosch 8 Series Oven・層二
- 上下火功能預熱至 180 度C。
- 放入蛋糕糊後,先烤 10 分鐘,取出畫線(可省略)。
- 再續烤 17 分鐘左右。
All you need |
I use this Bosch 8 series oven. Preheat to 180℃. |
KitchenAid Mixer 5Q |
Beat the egg yolk. |
Add sugar and mix till dissolved. |
Add water and mix for a couple of seconds. |
Add oil and mix well. |
Sifted flour. |
Add all the sifted flour and mix well till smooth. |
After 7:30 mins of mixing, the meringue looks like this. This is a little too stiff for me. |
The egg yolk batter. |
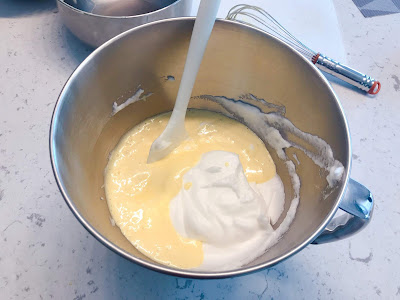
Add some (1/3) meringue into egg yolk batter and mix well. |
Pour (the egg yolk batter+1/3 meringue mix) into the remaining meringue and gently mix well. |
Pour earl grey paste into a bowl. |
Add some cake batter into the paste. |
And mix well. |
Pour the mix into cake batter and mix well again. |
Pour cake batter into the mold. This chiffon cake mold is 17 cm round. It is a higher mold usually needs 4 eggs. |
After 10 mis of baking, you can take the cake out and draw lines. Or you can skip this step and let the cake crack some lines by itself. |
After done baking, take the cake out, put it upside down and let it cool down. I will cover it with plastic wrap and put it in refrigerator for 20 mins before unmold the cake. |
濃郁抹茶戚風蛋糕
【蛋白霜】
- 蛋白:3 個
- 海藻糖:46g
【做法】
- KitchenAid 5Q。速度 4,計時器開始計時,不中斷。蛋白打到粗泡,約 1:30 分鐘,加入 1/3 的糖。約 2:30 分鐘,加入另一 1/3 的糖。約 3:30 分鐘,加入最後的 1/3 的糖。續攪拌至 7~8 分鐘,蛋白霜即完成。
【蛋黃糊】
- 蛋黃:3 個
- 上白糖:24g
- 水:30g
- 油:30g
- 低筋麵粉:60g
【做法】
- 蛋黃打散攪拌至稍微變色。
- 加入糖,攪拌至沒有顆粒。
- 加入水,攪拌均勻。
- 加入油,攪拌均勻。
- 加入過篩的粉,攪拌至沒有粉粒。
【蛋糕糊做法】
- 將約 1/3 的蛋白霜加入蛋黃糊中,攪拌均勻。
- 再將上述 1 的混合物加入蛋白霜中,攪拌均勻。
- 將約 1/3 的 2 混合物加入抹茶醬中攪拌均勻。
- 將 3 的混合物加入剩下的 2 中,攪拌均勻。
- 入模。
- 小山園抹茶粉:20g
- 水:60g左右
【烤程】Bosch 8 Series,層二
- 上下火功能,預熱至 190 度C
- 放入蛋糕糊後調降溫度至 180 度C
- 先烤 10 分鐘後,拿出來畫線,再續烤 18+ 分鐘
2019年7月16日 星期二
巧克力戚風蛋糕 Chocolate Chiffon Cake
2019年7月6日 星期六
手作線上課程 Handmade Jewelry Online Courses
趁著搬家,把『手食+手飾』的工具與材料好好整理一番。很久沒有玩珠珠,工具已放在頂樓好久好久,今天終於重見天日!
我會做的飾品都沒有太多技巧,大部分是自己的創意,太難太傷手的技巧我會自動放棄,所以幾年前寫了一些線上課程,供有興趣的人參考。
【Lesson 1:認識材料與工具】
【Lesson 2:簡易 9 針】
【Lesson 3:固定式 9 針】
【Lesson 4:電動捲線器 】
【Lesson 5:網狀C圈 Chain Maille】
【Lesson 6:魚骨編】
【Lesson 7:人字編】
【Lesson 8:線材套管與工具】
【Lesson 9:簡易編花】
【Lesson 10: AB 黏土(Swarovski Epoxy Clay)】
【自製C圈】
我會做的飾品都沒有太多技巧,大部分是自己的創意,太難太傷手的技巧我會自動放棄,所以幾年前寫了一些線上課程,供有興趣的人參考。
【Lesson 1:認識材料與工具】
【Lesson 2:簡易 9 針】
【Lesson 3:固定式 9 針】
【Lesson 4:電動捲線器 】
【Lesson 5:網狀C圈 Chain Maille】
【Lesson 6:魚骨編】
【Lesson 7:人字編】
【Lesson 8:線材套管與工具】
【Lesson 9:簡易編花】
【Lesson 10: AB 黏土(Swarovski Epoxy Clay)】
【自製C圈】
訂閱:
文章 (Atom)