2017年8月30日 星期三

義式杏仁餅 Cantuccini

前幾天看到 Michela Chiappa 的節目,裡頭介紹了義式杏仁餅的作法,非常簡單,可參考以下連結看原配方:【Cantuccini Recipe by Michela Chiappa from Michela's Tuscan Kitchen】

昨晚突發奇想的改了一點配方,糖的部分是一半的柴燒黑糖,一半海藻糖,奶油就以椰子油代替,沒想到超合我胃口!


【材料】4.5 吋活動圓模(一人份)
  1. 中筋麵粉(All Purpose):56g
  2. 蘇打粉:1/4t
  3. 柴燒黑糖(有小小顆粒沒有關係):26g
  4. 海藻糖:30g
  5. 鹽:1/8t
  6. 全蛋液:25g
  7. 白蘭地:1/4t
  8. 香草精:1/4t
  9. 椰子油:1T
  10. 杏仁果粒:56g(稍微烘烤一下)

【作法】KA 5Q 攪拌器,槳狀配件
  1. 烤箱預熱至 180 度C。
  2. 模具底部及周圍塗上薄薄一層奶油。
  3. 麵粉+蘇打粉過篩,加進攪拌缸。
  4. 加入糖、鹽,以打蛋器攪拌均勻。
  5. 加入全蛋液、白蘭地、香草精,以槳狀配件攪拌,快成糰後,加入椰子油,攪拌均勻。
  6. 加入杏仁果粒,攪拌一會,會壓碎一些杏仁果粒,沒關係,然後用攪拌刮刀攪拌均勻,會很黏稠。
  7. 餅乾麵糰整個挖進模具中,壓平,厚度約 3 公分。
  8. 放入烤箱。

【烤程】Miele 6260,層二淺烤盤,上鋪一張烘培紙。因為模具只有 4.5 吋,烤 25 即可。

溫熱時切比較好切


2017年8月27日 星期日

水浴法の黑芝麻戚風蛋糕

本來要試好朋友建議的水浴法,出了點小差錯,有遺憾,明天再來一次!
因為水浴法容易造成底部太濕,朋友想出另外放一盤水,蛋糕模具的底部還是放在烤盤上,沒有接觸到水,或許會有不一樣的效果。我之前是深烤盤放水,上面再加烤架,烤模放在烤架上,並沒有直接接觸水,雖底部不會軟爛,但有時想要有底部也有焦焦的感覺似乎做不到。今天原本要試,但找到的模具竟然會漏水,我實在不想中途開烤箱,所以就任憑它慢慢地流出來,烤好的成品會回縮,如果是之前,並沒有縮得如此嚴重,有些可惜!不過口感還是很濕潤!


【今日材料】七吋不沾活動圓模

{蛋黃糊}
  1. 蛋黃:3 個
  2. 本和香糖:24g
  3. 牛奶:30g
  4. 葡萄籽油:30g
  5. 黑芝麻粉:10g
  6. 低粉:55g


{蛋白霜}
  1. 蛋白:3 個
  2. 海藻糖:46g
{How To} 打到 8 分發。KA 5Q 抬頭式攪拌機,速度 4。
  1. 第一分鐘,打出粗泡,加入1/3 糖。
  2. 大約第二分鐘,再加入 1/3 糖。
  3. 大約第三分鐘,再加入剩下的糖。 
  4. 這次共攪拌 7:30 分鐘。

{混合蛋糕糊}
  1. 把 1/2 蛋白霜加入蛋黃糊中,輕拌均勻。
  2. 再把 1 的混合物倒入剩下的蛋白霜中,輕拌均勻。
  3. 再把原味蛋糕糊倒入模具中,平整表面,入烤箱。


{烤程}  Miele 6260,層1最下層放淺烤盤,深烤盤再放在上面,另用一模具裝水。
  1. 上下火預熱至 180 度C。
  2. 放入蛋糕糊,降至 150 度C。
  3. 這次烤 63分鐘。


蝶豆花吐司

蝶豆花加了水就會變成藍色,要加入烘培材料顯現出明顯的藍色需要不少蝶豆花。
先用 20 朵乾燥蝶豆花泡水,水量就是 200g 麵粉所需的液體量,我通常先抓 65%,所以是 130g,70% 是 140g,能多加液體就多加。我先用一些熱水泡蝶豆花,之後都是加入冰塊,所以最終的蝶豆花水是冰水。我的攪拌器要打到薄膜,以現在的天氣,用到 0 度C的冰水都是 OK 的。


【今日材料】

  1. 高筋麵粉:200g
  2. 打細的蝶豆花末:1T
  3. 糖:16g
  4. 酵母:2g
  5. 蝶豆花水:130~140g(泡過的蝶豆花一起加入麵糰)
  6. 鹽:1/4t
  7. 無水奶油(Ghee):16g

【作法】KA 7Q 攪拌器
  1. 將材料 1~4 放入攪拌缸中,先用低速攪拌一下,再慢慢加入液體,先加入 130g,剩下的視麵糰的狀態斟酌。
  2. 加入鹽,繼續攪拌。鹽能幫助麵糰成糰。
  3. 麵糰成糰後加入切成小塊的奶油,攪拌至撐出薄膜,終溫最好在 26 度C。
  4. 第一次發酵至兩倍大。
  5. 取出麵糰,分割成兩份,滾圓,鬆弛 10 分鐘。
  6. 每份麵糰桿平,拍出氣泡,捲起,放入烤模。
  7. 第二次發酵 30 分鐘。
  8. 烤箱預熱至 210 度C。Miele 6260,層二,淺烤盤,放入麵糰,先烤 10 分鐘,蓋上鋁箔紙,再烤 10 分鐘。
  9. 烤好取出,輕摔一下烤模,倒出麵包,放涼。


2017年8月26日 星期六

假日幸福

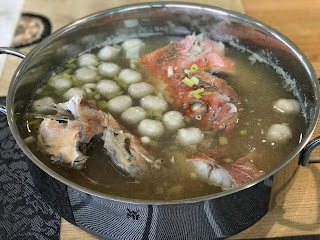
老哥的好朋友釣了魚,送給老媽,我們大夥便一起去老媽住處吃晚餐!好不快樂!

主角:鮮魚湯


我準備的點心之一

我準備的點心之二


2017年8月25日 星期五

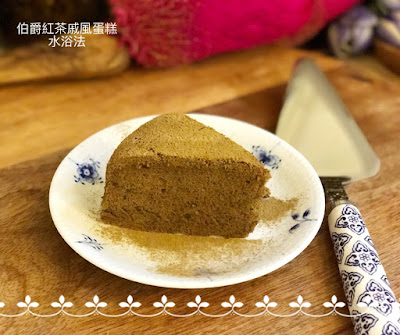
水浴法の伯爵紅茶戚風蛋糕

看了烘培太太的網站,發現以水浴法做的的戚風蛋糕很不錯,來做做看。

參考:http://www.bakingtaitai.com/2016/07/thai-milk-tea-cotton-cake.html


  • 冷藏後非常濕潤爽口
  • 烤好不用倒扣,不回縮。


【今日材料】七吋活動圓模,可用不沾烤模,如果是一般烤模,可於周邊塗上薄薄一層奶油。

{蛋黃糊}
  1. 蛋黃:3 個
  2. 糖:24g
  3. 水:30g
  4. 紅茶包末:1 包(磨細)
  5. 葡萄籽油:30g
  6. 娜麗茹卡伯爵紅茶粉:7g
  7. 特級紫羅蘭低粉:56g


{蛋白霜}(8 分)
  1. 蛋白:3 個
  2. 海藻糖:46g
  3. 玉米粉:1/2t(可不加)
{How To} 打到 8 分發。KA 5Q 抬頭式攪拌機,速度 4。
  1. 第一分鐘,打出粗泡,加入1/3 糖。
  2. 大約第二分鐘,再加入 1/3 糖。
  3. 大約第三分鐘,再加入剩下的糖和玉米粉。 
  4. 這次共攪拌 7:20 分鐘。


【烤程】Miele 6260,深烤盤置於層一,加上烤架。上下火功能預熱至 180 度C,熱水進爐。
  1. 放入蛋糕糊七吋圓模於烤架上。
  2. 蓋上烤箱門,降溫至 150 度C,烤 60~70 分鐘,今天烤了 60 分鐘。
  3. 烤好將蛋糕取出,輕震幾下烤模,放在烤架上冷卻 10 來分鐘,即可脫模,完全冷卻後再冷藏。


2017年8月23日 星期三

雙色伯爵戚風蛋糕


【今日材料】七吋煙囪模

{蛋黃糊}
  1. 蛋黃:3 個
  2. 蔗糖:24g
  3. 牛奶:30g
  4. 葡萄籽油:30g
  5. 低粉:58g

{紅茶醬}
  1. 伯爵紅茶粉:6g
  2. 溫水:15g
  • 將紅茶粉與溫水攪拌均勻,備用。

{蛋白霜}
  1. 蛋白:3 個
  2. 海藻糖:46g
  3. 玉米粉:1/2t
{How To} 打到 8 分發。KA 5Q 抬頭式攪拌機,速度 4。
  1. 第一分鐘,打出粗泡,加入1/3 糖。
  2. 大約第二分鐘,再加入 1/3 糖。
  3. 大約第三分鐘,再加入剩下的糖和玉米粉。 
  4. 這次共攪拌 7:20 分鐘。

{混合蛋糕糊}
  1. 把 1/2 蛋白霜加入蛋黃糊中,輕拌均勻。
  2. 再把 1 的混合物倒入剩下的蛋白霜中,輕拌均勻。
  3. 取出一半的蛋糕糊,加入抹茶醬,攪拌均勻。
  4. 把抹茶蛋糕糊倒入模具中,平整表面。
  5. 再把原味蛋糕糊倒入模具中,平整表面,入烤箱。


{烤程}  Miele 6260,層1最下層放淺烤盤
  1. 上下火預熱至 180 度C。
  2. 放入蛋糕糊,降至 150 度C。
  3. 這次烤 53分鐘,表面有彈性,些許沙沙聲(但乾了一些,可調整至 50 分鐘即可)。


2017年8月21日 星期一

抹茶黑芝麻乳酪蛋糕

今天第一次做的抹茶黑芝麻乳酪蛋糕因為沒有把作法看清楚,沒有用水浴法烤,雖也成功,但想試試原配方的方法,所以再做一次。

我的水浴法並沒有把蛋糕模具浸泡在水裡。Miele 烤箱附有深烤盤,淺烤盤,和烤架。把深烤盤放層 1,上面直接放烤架,熱水進爐,蛋糕放在烤架上,烤了 18 分鐘左右,周圍有些要分離,中間還沒熟透就可以了。

關火後,烤箱門微開,蛋糕整個放在烤箱裡慢慢冷卻,約 45 分鐘。之後可以取出放在網架上至完全涼,即可移入冰箱冷藏,不需要再包保鮮膜,因為這樣蛋糕表面會有很多水氣。蛋糕最少冷藏四小時再脫模,隔夜更好。(這是完全照 Hungry Rabbit 所述,我覺得挺適合我的烤箱。)


享用前撒上抹茶粉


以下資料取自:http://hungryrabbit.com/2012/02/matcha-sesame-cheesecake/

***我使用一半的材料,做兩個 4.5 吋活動圓模***
***餅底我用消化餅乾,不加糖和鹽***


MATCHA SESAME CHEESECAKES

INGREDIENTS:

COOKIE CRUST(餅底)
  • 1 cup animal cracker crumbs
  • (動物形狀小餅乾:1cup)
  • 4 tablespoons (2 ounces) unsalted butter, melted; plus more, room temperature, for the pans
  • (無鹽奶油:57g 融化)
  • 3 tablespoons granulated sugar
  • (糖:3T)
  • 1/4 teaspoon fine sea salt
  • (鹽:1/4t)
  • 3 tablespoons black sesame seeds, toasted
  • (黑芝麻:3T)

CHEESECAKE FILLING(起司餡)
  • 16 ounces cream cheese, room temperature
  • (Cream cheese:453g)
  • 3/4 cup (5-1/4 ounces) granulated sugar
  • (糖:149g)
  • 2 tablespoons unbleached all-purpose flour
  • (中粉:2T)
  • 1/3 cup sour cream, room temperature
  • (酸奶:1/3cup)
  • 1/2 teaspoon pure vanilla extract
  • (香草精:1/2t)
  • 1/2 teaspoon pure almond extract
  • (杏仁精:1/2t)
  • 2 large eggs, room temperature
  • (全蛋:2 個)
  • 2 tablespoons matcha powder, plus 1/4 cup for dusting
  • (抹茶粉:2T)
  • 1/2 cup black sesame powder
  • (黑芝麻粉:1/2cup)

DIRECTIONS:


COOKIE CRUST

1. Preheat the oven to 350 degrees(烤箱預熱至175 度C). Butter the sides of 4 4-inch springform pans. (模具底部與周圍塗上奶油)Wrap exterior of pans (including base) in a layer of foil.
2. Process animal crackers in food processor until fine. Add butter, sugar, and salt; pulse until combined, add sesame seeds and stir to combine. (用食物調理機打碎餅乾,加入融化的奶油、糖、鹽,攪拌均勻)Divide mixture evenly among pans and pat into an even layer using the bottom of a measuring cup. (鋪在模具底部,壓緊實)Place pans on a baking sheet. Bake until the crust is firm to the touch and deeply golden brown, about 15-18 minutes. Transfer pans to a wire rack to cool completely.(烤 15-18 分鐘,取出完全放涼)
CHEESECAKE FILLING
1. In the bowl of an electric mixer fitted with the paddle attachment, beat the cream cheese on medium speed until fluffy, about 2-3 minutes.(用攪拌機,槳狀配件,中速打勻 cream cheese,約 2-3 分鐘)
2. In a small bowl, whisk sugar and flour to combine. (在另一小碗中,用打蛋器混合糖及麵粉)Reduce mixer speed to low, gradually add sugar mixture to cream cheese(攪拌機速度降至低速,慢慢的加入糖及麵粉混合物於 cream cheese 中); mix until smooth. Add sour cream, vanilla and almond extract(加入酸奶、香草精、杏仁精); mix until smooth. Add eggs, one at a time(一次加入一個蛋), beating until just combined.
3. Divide cream cheese filling into 2 bowls(將起司餡料分成兩半). Add matcha powder to one and black sesame powder to the other(一個加入抹茶粉,一個加入黑芝麻粉). Stir gently to combine, do not to over mix. Divide sesame-cream cheese mixture evenly among the pans with crust, follow by matcha -cream cheese filling. Set pans inside a roasting pans. Carefully ladle boiling water into roasting pan, halfway up sides of springform pans.(熱水入,水浴法)
4. Bake until cakes are set but still slightly wobbly in the center, 15 to 20 minutes(約烤 15-20 分鐘). Turn off oven; leave cakes in oven with the door slightly ajar, 45 minutes(關掉烤箱,將烤箱門微開,蛋糕留在烤箱中約 45分鐘). Transfer pans to a wire rack; let cakes cool completely. Refrigerate, uncovered, at least 4 hours or overnight.(之後把蛋糕移至烤架上,完全放涼後,不要蓋任何東西,直接把含模具的蛋糕放入冰箱冷藏最少 4 小時)
5. Release cakes from spring form, dust top with matcha powder before serving.(享用前可撒上抹茶粉)


雙色抹茶戚風蛋糕


【今日材料】七吋煙囪模

{蛋黃糊}
  1. 蛋黃:3 個
  2. 蜜糖:24g
  3. 牛奶:30g
  4. 芥花油:30g
  5. 低粉:58g

{抹茶醬}
  1. 抹茶粉:5g
  2. 溫水:13g
  • 將抹茶粉與溫水攪拌均勻,備用。

{蛋白霜}
  1. 蛋白:3 個
  2. 海藻糖:46g
  3. 玉米粉:1/2t
{How To} 打到 8 分發。KA 5Q 抬頭式攪拌機,速度 4。
  1. 第一分鐘,打出粗泡,加入1/3 糖。
  2. 大約第二分鐘,再加入 1/3 糖。
  3. 大約第三分鐘,再加入剩下的糖和玉米粉。 
  4. 這次共攪拌 7:20 分鐘。

{混合蛋糕糊}
  1. 把 1/2 蛋白霜加入蛋黃糊中,輕拌均勻。
  2. 再把 1 的混合物倒入剩下的蛋白霜中,輕拌均勻。
  3. 取出一半的蛋糕糊,加入抹茶醬,攪拌均勻。
  4. 把抹茶蛋糕糊倒入模具中,平整表面。
  5. 再把原味蛋糕糊倒入模具中,平整表面,入烤箱。


{烤程}  Miele 6260,層1,烤盤(這次放層一,因為之前有幾次有下凹現象,下凹不是下火太旺,是不足,所以下移。)
  1. 上下火預熱至 180 度C。
  2. 放入蛋糕糊,降至 150 度C。
  3. 這次烤 53分鐘,表面有彈性,些許沙沙聲。


Matcha Sesame Cheesecake/Hungry Rabbit

隨意在網路逛逛,發現了【Hungry Rabbit】這個網站,版主 Ken 的作品都美極了!決定先做這個【抹茶黑芝麻乳酪蛋糕】MATCHA SESAME CHEESECAKE


以下資料取自:http://hungryrabbit.com/2012/02/matcha-sesame-cheesecake/

***我使用一半的材料,放入六吋活動圓模***


MATCHA SESAME CHEESECAKES

INGREDIENTS:

COOKIE CRUST(餅底)
  • 1 cup animal cracker crumbs
  • (動物形狀小餅乾:1cup)
  • 4 tablespoons (2 ounces) unsalted butter, melted; plus more, room temperature, for the pans
  • (無鹽奶油:57g 融化)
  • 3 tablespoons granulated sugar
  • (糖:3T)
  • 1/4 teaspoon fine sea salt
  • (鹽:1/4t)
  • 3 tablespoons black sesame seeds, toasted
  • (黑芝麻:3T)

CHEESECAKE FILLING(起司餡)
  • 16 ounces cream cheese, room temperature
  • (Cream cheese:453g)
  • 3/4 cup (5-1/4 ounces) granulated sugar
  • (糖:149g)
  • 2 tablespoons unbleached all-purpose flour
  • (中粉:2T)
  • 1/3 cup sour cream, room temperature
  • (酸奶:1/3cup)
  • 1/2 teaspoon pure vanilla extract
  • (香草精:1/2t)
  • 1/2 teaspoon pure almond extract
  • (杏仁精:1/2t)
  • 2 large eggs, room temperature
  • (全蛋:2 個)
  • 2 tablespoons matcha powder, plus 1/4 cup for dusting
  • (抹茶粉:2T)
  • 1/2 cup black sesame powder
  • (黑芝麻粉:1/2cup)

DIRECTIONS:

COOKIE CRUST
1. Preheat the oven to 350 degrees(烤箱預熱至175 度C). Butter the sides of 4 4-inch springform pans. (模具底部與周圍塗上奶油)Wrap exterior of pans (including base) in a layer of foil.
2. Process animal crackers in food processor until fine. Add butter, sugar, and salt; pulse until combined, add sesame seeds and stir to combine. (用食物調理機打碎餅乾,加入融化的奶油、糖、鹽,攪拌均勻)Divide mixture evenly among pans and pat into an even layer using the bottom of a measuring cup. (鋪在模具底部,壓緊實)Place pans on a baking sheet. Bake until the crust is firm to the touch and deeply golden brown, about 15-18 minutes. Transfer pans to a wire rack to cool completely.(烤 15-18 分鐘,取出完全放涼)
CHEESECAKE FILLING
1. In the bowl of an electric mixer fitted with the paddle attachment, beat the cream cheese on medium speed until fluffy, about 2-3 minutes.(用攪拌機,槳狀配件,中速打勻 cream cheese,約 2-3 分鐘)
2. In a small bowl, whisk sugar and flour to combine. (在另一小碗中,用打蛋器混合糖及麵粉)Reduce mixer speed to low, gradually add sugar mixture to cream cheese(攪拌機速度降至低速,慢慢的加入糖及麵粉混合物於 cream cheese 中); mix until smooth. Add sour cream, vanilla and almond extract(加入酸奶、香草精、杏仁精); mix until smooth. Add eggs, one at a time(一次加入一個蛋), beating until just combined.
3. Divide cream cheese filling into 2 bowls(將起司餡料分成兩半). Add matcha powder to one and black sesame powder to the other(一個加入抹茶粉,一個加入黑芝麻粉). Stir gently to combine, do not to over mix. Divide sesame-cream cheese mixture evenly among the pans with crust, follow by matcha -cream cheese filling. Set pans inside a roasting pans. Carefully ladle boiling water into roasting pan, halfway up sides of springform pans.(熱水入,水浴法)
4. Bake until cakes are set but still slightly wobbly in the center, 15 to 20 minutes(約烤 15-20 分鐘). Turn off oven; leave cakes in oven with the door slightly ajar, 45 minutes(關掉烤箱,將烤箱門微開,蛋糕留在烤箱中約 45分鐘). Transfer pans to a wire rack; let cakes cool completely. Refrigerate, uncovered, at least 4 hours or overnight.(之後把蛋糕移至烤架上,完全放涼後,不要蓋任何東西,直接把含模具的蛋糕放入冰箱冷藏最少 4 小時)
5. Release cakes from spring form, dust top with matcha powder before serving.(享用前可撒上抹茶粉)




2017年8月19日 星期六

假日幸福

我們的養怡山居{蘇軾:養怡之福,可得永年}已經好久沒去了。上星期老哥大刀闊斧地整理,終於把這大片叢林恢復舊貌,讓我們可以再次拜訪!
傍晚時,我們先在二十方用過晚餐再上山。

【二十方】

這株重辦蝶豆花長得實在太茂密了,昨天採收了上百朵!

重辦蝶豆花太美了!

竟然插枝也給它活了!

【我們的晚餐】

老媽的拿手鹹飯:這次是多種香料鮭魚飯。

豬尾冬瓜丸子湯

炒青菜

鑄鐵鍋烤羊肋排

酷斃了

點心:錫蘭紅茶戚風蛋糕

點心二:蜂蜜檸檬輕乳酪


【養怡山居】
有許多的回憶與思念


錫蘭紅茶戚風蛋糕

想用椰子油試試戚風蛋糕,也剛好可以在假日帶回南部與家人共享!

表面撒上楓糖片


【今日材料】七吋煙囪模

{蛋黃糊}
  1. 蛋黃:3 個
  2. 蜜糖:24g
  3. 水:30g
  4. 椰子油:30g
  5. 錫蘭紅茶粉:10g
  6. 低粉:55g


{蛋白霜}
  1. 蛋白:3 個
  2. 海藻糖:46g
{How To} 打到 8 分發。KA 5Q 抬頭式攪拌機,速度 4。
  1. 第一分鐘,打出粗泡,加入1/3 糖。
  2. 大約第二分鐘,再加入 1/3 糖。
  3. 大約第三分鐘,再加入剩下的糖。 
  4. 這次共攪拌 8:30 分鐘,覺得太發,不好拌勻。

【混合】
  1. 把 1/2 蛋白霜加入蛋黃糊,輕輕翻拌均勻。
  2. 再把上述的混合物倒入剩下的蛋白霜中,輕輕翻拌均勻。
  3. 入模,輕震出氣泡。

{烤程}  Miele 6260,層 2,烤盤
  1. 上下火預熱至 180 度C
  2. 降至 150 度C
  3. 烤 50 分鐘


2017年8月17日 星期四

紅茶輕乳酪蛋糕

參考【无花果蜂蜜柠檬芝士蛋糕】的作法,這蛋糕還真有創意!


多烤了 20 分鐘,放涼後表面較不易皺。


【餅底】7 吋活動圓模,周圍塗上薄薄奶油,底部鋪烤盤紙。
  1. 消化餅乾:5 片
  2. 蔓越莓乾:15g
  3. 無鹽奶油:20g
  4. 杏桃罐頭:適量
  • 作法:
  1. 用食物調理機打碎消化餅乾和蔓越莓。
  2. 融化奶油。
  3. 加入打碎的餅乾和蔓越莓乾,搓揉均勻。
  4. 平鋪在模具底層,用力壓緊。取出杏桃罐頭中四片杏桃,瀝乾水分,切1/4片狀,鋪在餅底上。
  5. 放入冰箱冷藏,備用。

【蛋黃糊】

  1. Cream Cheese:110g
  2. 無鹽奶油:24g
  3. 牛奶:55g
  4. Maple Syrup:20g
  5. 蛋黃:3 個
  6. 低粉:16g
  7. 錫蘭紅茶粉:5g
  8. 玉米粉:10g

{How To}
  1. 隔水加熱融化 cream cheese,以打蛋器攪拌至乳霜狀。
  2. 加入奶油,繼續攪拌均勻。
  3. 加入牛奶、楓糖漿,繼續攪拌均勻。
  4. 蛋黃一顆一顆加入,每加入一顆攪拌均勻。
  5. 玉米粉+低粉+紅茶粉過篩,加入蛋黃糊中,攪拌至無粉粒。 


【蛋白霜】可把全部糖放在這部分,也可分半至蛋黃糊中,只是加入糖的 cream cheese 不好攪拌均勻,糖份多的蛋白霜比較穩定。
  1. 蛋白:3 個
  2. 海藻糖:55g

{How To} 打到七分發。KA 5Q 抬頭式攪拌機,速度 4。
  1. 第一分鐘,打出粗泡,加入1/3 糖。
  2. 大約第二分鐘,再加入 1/3 糖。
  3. 大約第三分鐘,再加入剩下的糖。 
  4. 這次共攪拌 7 分鐘,蛋白霜呈不穩定的彎嘴狀。

【混合】
  1. 把 1/3 蛋白霜加入蛋黃糊,輕輕翻拌均勻。
  2. 再加入 1/3 蛋白霜進去蛋黃糊中,輕輕翻拌均勻。
  3. 再加入剩下的蛋白霜進去蛋黃糊中,輕輕翻拌均勻。
  4. 入模,輕震出氣泡。


【烤程】Miele 6260,淺烤盤+深烤盤置於層一,烤架置於層二,上下火功能預熱至 195 度C。
  1. 放入蛋糕糊七吋圓模於烤架上,深烤盤加入近兩杯 800cc 的冷水,外加一些冰塊。
  2. 蓋上烤箱門,降溫至 165 度C,烤 17 分鐘。
  3. 降溫至 125 度C,先設定 90 分鐘,另外加入冷水約 400cc。
  4. 蛋糕表面有彈性沒有沙沙聲即烤好。烤好打開烤箱,把烤肉架往上移,蛋糕放涼 10 分鐘即可脫模,烤箱不用關。


咖啡輕乳酪 iii

烤不夠久,放涼後表面皺了...


【蛋黃糊】7吋三能活動圓模,三顆蛋,模具塗上薄薄奶油

  1. Cream Cheese:110g
  2. 無鹽奶油:24g
  3. 咖啡:55g
  4. Coffee Syrup:20g
  5. 蛋黃:3 個
  6. 低粉:16g
  7. 咖啡粉:5g
  8. 玉米粉:10g

{How To}
  1. 隔水加熱融化 cream cheese,以打蛋器攪拌至乳霜狀。
  2. 加入奶油,繼續攪拌均勻。
  3. 加入咖啡、咖啡糖漿,繼續攪拌均勻。
  4. 蛋黃一顆一顆加入,每加入一顆攪拌均勻。
  5. 玉米粉+低粉+咖啡粉過篩,加入蛋黃糊中,攪拌至無粉粒。 


【蛋白霜】可把全部糖放在這部分,也可分半至蛋黃糊中,只是加入糖的 cream cheese 不好攪拌均勻,糖份多的蛋白霜比較穩定。
  1. 蛋白:3 個
  2. 海藻糖:55g

{How To} 打到七分發。KA 5Q 抬頭式攪拌機,速度 4。
  1. 第一分鐘,打出粗泡,加入1/3 糖。
  2. 大約第二分鐘,再加入 1/3 糖。
  3. 大約第三分鐘,再加入剩下的糖。 
  4. 這次共攪拌 7 分鐘,蛋白霜呈不穩定的彎嘴狀。

【混合】
  1. 把 1/3 蛋白霜加入蛋黃糊,輕輕翻拌均勻。
  2. 再加入 1/3 蛋白霜進去蛋黃糊中,輕輕翻拌均勻。
  3. 再加入剩下的蛋白霜進去蛋黃糊中,輕輕翻拌均勻。
  4. 入模,輕震出氣泡。


【烤程】Miele 6260,淺烤盤+深烤盤置於層一,烤肉架置於層二,上下火功能預熱至 195 度C。
  1. 放入蛋糕糊七吋圓模於烤肉架上,深烤盤加入近兩杯 800cc 的冷水,外加一些冰塊。
  2. 蓋上烤箱門,降溫至 165 度C,烤 17 分鐘。
  3. 降溫至 125 度C,先設定 70 分鐘,另外加入冷水約 400cc。
  4. 蛋糕表面有彈性即烤好。烤好打開烤箱,把烤肉架往上移,蛋糕放涼 10 分鐘即可脫模,烤箱不用關。


2017年8月15日 星期二

抹茶冷凍乳酪蛋糕


綜合了生乳酪與我自己的冷凍乳酪配方,完成了這個雙色冷凍乳酪蛋糕。


參考作法如下:
以下資料取自網站:http://www.bakerita.com/no-bake-layered-blueberry-cheesecake-gluten-free-paleo-vegan/


No-Bake Layered Blueberry Cheesecake (Gluten Free, Paleo + Vegan)


Prep time
Total time
Author: 
Serves: 8 slices
Ingredients 
1. For the crust (6吋活動圓模)
  • ½ cup raw pecans (胡桃)
  • ½ cup almond flour (杏仁粉)
  • 2 pitted dates (黑棗)
  • 2 tablespoons coconut oil (椰子油)
  • 1 teaspoon cinnamon (肉桂粉)
  • ¼ teaspoon kosher salt (細鹽)

2. For the cheesecake
  • 2 cups raw cashews, soaked in cold water for at least four hours or preferably overnight (see Notes)
  • ½ cup canned coconut milk, shaken (椰奶)
  • ¼ cup coconut oil, melted and cooled (use refined coconut oil if you want no coconut flavor) (椰子油)
  • ⅓ cup pure maple syrup (楓糖)
  • 2 tablespoons fresh lemon juice (檸檬汁)
  • 1 tablespoon vanilla extract or ½ teaspoon vanilla bean powder (香草精)
  • ¼ cup freeze-dried blueberries (冷凍藍莓)

3. For the blueberry layer
  • 1 cup fresh or frozen blueberries (thawed, if frozen) (新鮮或冷凍藍莓)
  • 1 tablespoon fresh lemon juice(檸檬汁)
  • 1 tablespoon chia seeds(奇亞籽)【奇亞籽的 8 大功效與副作用】

Directions

  1. Grease a 6” springform pan with coconut oil, or line an 6” cake pan with strips of parchment paper for easy removal, and grease well with coconut oil. Set aside. (6 吋活動圓模底部鋪上烤盤紙,周圍可放透明圍邊)
  2. Add the pecans, almond flour, pitted dates, coconut oil, cinnamon and salt to a food processor or high-powered blender and pulverize until it comes together into a sort of sticky dough, with small pecan bits remaining. Don’t over process, or it’ll turn into nut butter! Press the pecan date dough evenly along the bottom of the prepared pan.(把餅底餡料除椰子油外全部放入食物調理機,斷斷續續打至粗粒狀,加入椰子油,用手抓均勻,取出餅底餡放入模具,壓緊實,放入冰箱冷藏)
  3. In the same food processor or high-powered blender (no need to wash between - I used my Vitamix, but most powerful blenders should do the job), combine all of the filling ingredients except for the freeze dried blueberries and blend for about 2 minutes, or until the mixture is silky smooth and creamy. Scrape down the sides as necessary. You may need to add a bit more coconut milk or lemon juice to get it to blend smoothly if your blender isn’t super high-powered.(使用 Vitamix 以高速攪拌所有餡料,約需 2 分鐘,呈現非常綿密細緻的狀態)
  4. Once it’s smooth, taste the mixture and adjust the sweetness/tartness/spice levels, if desired.(調整口味)
  5. Pour ⅔ of the filling into the prepared pan over the pecan crust. Smooth out the top and tap the pan hard against the counter a few times to release any air bubbles. Place in the freezer.(取出模具,倒入 2/3 餡料,輕敲出氣泡,放入冷凍)
  6. Add the freeze dried blueberries to the remaining batter and blend to incorporate. Spread over the plain layer. Return to the freezer.(剩下的餡料加入冷凍藍莓,打至綿密狀,取出模具,倒入餡料,再放回冷凍)
  7. Rinse out the blender, and add the fresh blueberries, lemon juice and chia seeds to it. Blend until smooth, and then pour over the other layers.(沖洗攪拌杯,放入第三層的餡料,攪拌至滑順狀,取出模具,倒入餡料,再放入冷凍)
  8. Place in the freezer to set for at least 3 hours or until completely firm before slicing and serving. I recommend running your knife under hot water to warm it up before cutting the cheesecake with the still-hot (dried) knife.(最少冷凍 3 小時)
  9. Serve frozen or let them thaw at room temperature for 10-15 minutes before serving. Store in the freezer for up to 2 weeks.(回溫 10~15 分鐘再享用)
Notes
You can also cover the cashews in very hot/boiling water and let them sit for about an hour if you want to speed up the process - it won't be quite as creamy, but it will do the trick!