2017年8月18日 星期五

紅茶輕乳酪蛋糕

參考【无花果蜂蜜柠檬芝士蛋糕】的作法,這蛋糕還真有創意!


多烤了 20 分鐘,放涼後表面較不易皺。


【餅底】7 吋活動圓模,周圍塗上薄薄奶油,底部鋪烤盤紙。
  1. 消化餅乾:5 片
  2. 蔓越莓乾:15g
  3. 無鹽奶油:20g
  4. 杏桃罐頭:適量
  • 作法:
  1. 用食物調理機打碎消化餅乾和蔓越莓。
  2. 融化奶油。
  3. 加入打碎的餅乾和蔓越莓乾,搓揉均勻。
  4. 平鋪在模具底層,用力壓緊。取出杏桃罐頭中四片杏桃,瀝乾水分,切1/4片狀,鋪在餅底上。
  5. 放入冰箱冷藏,備用。

【蛋黃糊】

  1. Cream Cheese:110g
  2. 無鹽奶油:24g
  3. 牛奶:55g
  4. Maple Syrup:20g
  5. 蛋黃:3 個
  6. 低粉:16g
  7. 錫蘭紅茶粉:5g
  8. 玉米粉:10g

{How To}
  1. 隔水加熱融化 cream cheese,以打蛋器攪拌至乳霜狀。
  2. 加入奶油,繼續攪拌均勻。
  3. 加入牛奶、楓糖漿,繼續攪拌均勻。
  4. 蛋黃一顆一顆加入,每加入一顆攪拌均勻。
  5. 玉米粉+低粉+紅茶粉過篩,加入蛋黃糊中,攪拌至無粉粒。 


【蛋白霜】可把全部糖放在這部分,也可分半至蛋黃糊中,只是加入糖的 cream cheese 不好攪拌均勻,糖份多的蛋白霜比較穩定。
  1. 蛋白:3 個
  2. 海藻糖:55g

{How To} 打到七分發。KA 5Q 抬頭式攪拌機,速度 4。
  1. 第一分鐘,打出粗泡,加入1/3 糖。
  2. 大約第二分鐘,再加入 1/3 糖。
  3. 大約第三分鐘,再加入剩下的糖。 
  4. 這次共攪拌 7 分鐘,蛋白霜呈不穩定的彎嘴狀。

【混合】
  1. 把 1/3 蛋白霜加入蛋黃糊,輕輕翻拌均勻。
  2. 再加入 1/3 蛋白霜進去蛋黃糊中,輕輕翻拌均勻。
  3. 再加入剩下的蛋白霜進去蛋黃糊中,輕輕翻拌均勻。
  4. 入模,輕震出氣泡。


【烤程】Miele 6260,淺烤盤+深烤盤置於層一,烤架置於層二,上下火功能預熱至 195 度C。
  1. 放入蛋糕糊七吋圓模於烤架上,深烤盤加入近兩杯 800cc 的冷水,外加一些冰塊。
  2. 蓋上烤箱門,降溫至 165 度C,烤 17 分鐘。
  3. 降溫至 125 度C,先設定 90 分鐘,另外加入冷水約 400cc。
  4. 蛋糕表面有彈性沒有沙沙聲即烤好。烤好打開烤箱,把烤肉架往上移,蛋糕放涼 10 分鐘即可脫模,烤箱不用關。


咖啡輕乳酪 iii

烤不夠久,放涼後表面皺了...


【蛋黃糊】7吋三能活動圓模,三顆蛋,模具塗上薄薄奶油

  1. Cream Cheese:110g
  2. 無鹽奶油:24g
  3. 咖啡:55g
  4. Coffee Syrup:20g
  5. 蛋黃:3 個
  6. 低粉:16g
  7. 咖啡粉:5g
  8. 玉米粉:10g

{How To}
  1. 隔水加熱融化 cream cheese,以打蛋器攪拌至乳霜狀。
  2. 加入奶油,繼續攪拌均勻。
  3. 加入咖啡、咖啡糖漿,繼續攪拌均勻。
  4. 蛋黃一顆一顆加入,每加入一顆攪拌均勻。
  5. 玉米粉+低粉+咖啡粉過篩,加入蛋黃糊中,攪拌至無粉粒。 


【蛋白霜】可把全部糖放在這部分,也可分半至蛋黃糊中,只是加入糖的 cream cheese 不好攪拌均勻,糖份多的蛋白霜比較穩定。
  1. 蛋白:3 個
  2. 海藻糖:55g

{How To} 打到七分發。KA 5Q 抬頭式攪拌機,速度 4。
  1. 第一分鐘,打出粗泡,加入1/3 糖。
  2. 大約第二分鐘,再加入 1/3 糖。
  3. 大約第三分鐘,再加入剩下的糖。 
  4. 這次共攪拌 7 分鐘,蛋白霜呈不穩定的彎嘴狀。

【混合】
  1. 把 1/3 蛋白霜加入蛋黃糊,輕輕翻拌均勻。
  2. 再加入 1/3 蛋白霜進去蛋黃糊中,輕輕翻拌均勻。
  3. 再加入剩下的蛋白霜進去蛋黃糊中,輕輕翻拌均勻。
  4. 入模,輕震出氣泡。


【烤程】Miele 6260,淺烤盤+深烤盤置於層一,烤肉架置於層二,上下火功能預熱至 195 度C。
  1. 放入蛋糕糊七吋圓模於烤肉架上,深烤盤加入近兩杯 800cc 的冷水,外加一些冰塊。
  2. 蓋上烤箱門,降溫至 165 度C,烤 17 分鐘。
  3. 降溫至 125 度C,先設定 70 分鐘,另外加入冷水約 400cc。
  4. 蛋糕表面有彈性即烤好。烤好打開烤箱,把烤肉架往上移,蛋糕放涼 10 分鐘即可脫模,烤箱不用關。


2017年8月16日 星期三

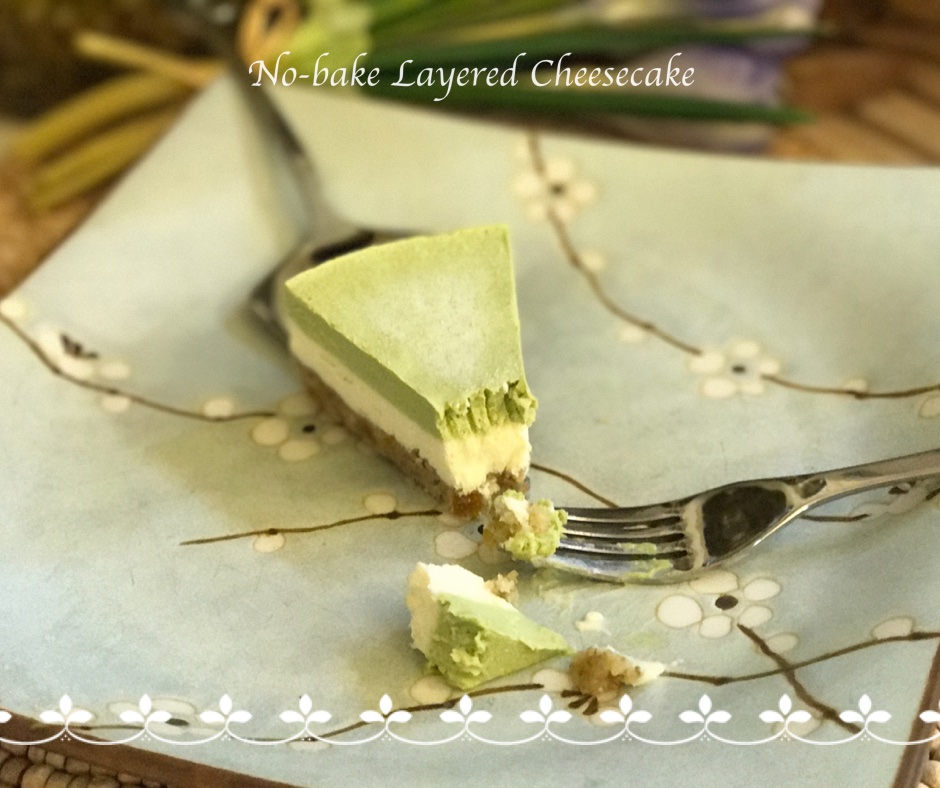
抹茶冷凍乳酪蛋糕


綜合了生乳酪與我自己的冷凍乳酪配方,完成了這個雙色冷凍乳酪蛋糕。


參考作法如下:
以下資料取自網站:http://www.bakerita.com/no-bake-layered-blueberry-cheesecake-gluten-free-paleo-vegan/


No-Bake Layered Blueberry Cheesecake (Gluten Free, Paleo + Vegan)


Prep time
Total time
Author: 
Serves: 8 slices
Ingredients 
1. For the crust (6吋活動圓模)
  • ½ cup raw pecans (胡桃)
  • ½ cup almond flour (杏仁粉)
  • 2 pitted dates (黑棗)
  • 2 tablespoons coconut oil (椰子油)
  • 1 teaspoon cinnamon (肉桂粉)
  • ¼ teaspoon kosher salt (細鹽)

2. For the cheesecake
  • 2 cups raw cashews, soaked in cold water for at least four hours or preferably overnight (see Notes)
  • ½ cup canned coconut milk, shaken (椰奶)
  • ¼ cup coconut oil, melted and cooled (use refined coconut oil if you want no coconut flavor) (椰子油)
  • ⅓ cup pure maple syrup (楓糖)
  • 2 tablespoons fresh lemon juice (檸檬汁)
  • 1 tablespoon vanilla extract or ½ teaspoon vanilla bean powder (香草精)
  • ¼ cup freeze-dried blueberries (冷凍藍莓)

3. For the blueberry layer
  • 1 cup fresh or frozen blueberries (thawed, if frozen) (新鮮或冷凍藍莓)
  • 1 tablespoon fresh lemon juice(檸檬汁)
  • 1 tablespoon chia seeds(奇亞籽)【奇亞籽的 8 大功效與副作用】

Directions

  1. Grease a 6” springform pan with coconut oil, or line an 6” cake pan with strips of parchment paper for easy removal, and grease well with coconut oil. Set aside. (6 吋活動圓模底部鋪上烤盤紙,周圍可放透明圍邊)
  2. Add the pecans, almond flour, pitted dates, coconut oil, cinnamon and salt to a food processor or high-powered blender and pulverize until it comes together into a sort of sticky dough, with small pecan bits remaining. Don’t over process, or it’ll turn into nut butter! Press the pecan date dough evenly along the bottom of the prepared pan.(把餅底餡料除椰子油外全部放入食物調理機,斷斷續續打至粗粒狀,加入椰子油,用手抓均勻,取出餅底餡放入模具,壓緊實,放入冰箱冷藏)
  3. In the same food processor or high-powered blender (no need to wash between - I used my Vitamix, but most powerful blenders should do the job), combine all of the filling ingredients except for the freeze dried blueberries and blend for about 2 minutes, or until the mixture is silky smooth and creamy. Scrape down the sides as necessary. You may need to add a bit more coconut milk or lemon juice to get it to blend smoothly if your blender isn’t super high-powered.(使用 Vitamix 以高速攪拌所有餡料,約需 2 分鐘,呈現非常綿密細緻的狀態)
  4. Once it’s smooth, taste the mixture and adjust the sweetness/tartness/spice levels, if desired.(調整口味)
  5. Pour ⅔ of the filling into the prepared pan over the pecan crust. Smooth out the top and tap the pan hard against the counter a few times to release any air bubbles. Place in the freezer.(取出模具,倒入 2/3 餡料,輕敲出氣泡,放入冷凍)
  6. Add the freeze dried blueberries to the remaining batter and blend to incorporate. Spread over the plain layer. Return to the freezer.(剩下的餡料加入冷凍藍莓,打至綿密狀,取出模具,倒入餡料,再放回冷凍)
  7. Rinse out the blender, and add the fresh blueberries, lemon juice and chia seeds to it. Blend until smooth, and then pour over the other layers.(沖洗攪拌杯,放入第三層的餡料,攪拌至滑順狀,取出模具,倒入餡料,再放入冷凍)
  8. Place in the freezer to set for at least 3 hours or until completely firm before slicing and serving. I recommend running your knife under hot water to warm it up before cutting the cheesecake with the still-hot (dried) knife.(最少冷凍 3 小時)
  9. Serve frozen or let them thaw at room temperature for 10-15 minutes before serving. Store in the freezer for up to 2 weeks.(回溫 10~15 分鐘再享用)
Notes
You can also cover the cashews in very hot/boiling water and let them sit for about an hour if you want to speed up the process - it won't be quite as creamy, but it will do the trick!


2017年8月15日 星期二

莓果生乳酪蛋糕


昨天的藍莓生乳酪蛋糕已經跟朋友分享完,再做一個綜合莓果的口味。因為覆盆莓有顆粒感,還是使用藍莓口感比較好。

作法請參考:【藍莓生乳酪蛋糕】


2017年8月14日 星期一

藍莓生乳酪蛋糕

參考網站【Bakerita.com】裡介紹的「No-Bake Layered Blueberry Cheesecake」來完成的一款蛋糕。


以下資料取自網站:http://www.bakerita.com/no-bake-layered-blueberry-cheesecake-gluten-free-paleo-vegan/

No-Bake Layered Blueberry Cheesecake (Gluten Free, Paleo + Vegan)


Prep time
Total time
Author: 
Serves: 8 slices
Ingredients 
1. For the crust (6吋活動圓模)
  • ½ cup raw pecans (胡桃)
  • ½ cup almond flour (杏仁粉)
  • 2 pitted dates (黑棗)
  • 2 tablespoons coconut oil (椰子油)
  • 1 teaspoon cinnamon (肉桂粉)
  • ¼ teaspoon kosher salt (細鹽)

2. For the cheesecake
  • 2 cups raw cashews, soaked in cold water for at least four hours or preferably overnight (see Notes)
  • ½ cup canned coconut milk, shaken (椰奶)
  • ¼ cup coconut oil, melted and cooled (use refined coconut oil if you want no coconut flavor) (椰子油)
  • ⅓ cup pure maple syrup (楓糖)
  • 2 tablespoons fresh lemon juice (檸檬汁)
  • 1 tablespoon vanilla extract or ½ teaspoon vanilla bean powder (香草精)
  • ¼ cup freeze-dried blueberries (冷凍藍莓)

3. For the blueberry layer
  • 1 cup fresh or frozen blueberries (thawed, if frozen) (新鮮或冷凍藍莓)
  • 1 tablespoon fresh lemon juice(檸檬汁)
  • 1 tablespoon chia seeds(奇亞籽)【奇亞籽的 8 大功效與副作用】

Directions

  1. Grease a 6” springform pan with coconut oil, or line an 6” cake pan with strips of parchment paper for easy removal, and grease well with coconut oil. Set aside. (6 吋活動圓模底部鋪上烤盤紙,周圍可放透明圍邊)
  2. Add the pecans, almond flour, pitted dates, coconut oil, cinnamon and salt to a food processor or high-powered blender and pulverize until it comes together into a sort of sticky dough, with small pecan bits remaining. Don’t over process, or it’ll turn into nut butter! Press the pecan date dough evenly along the bottom of the prepared pan.(把餅底餡料除椰子油外全部放入食物調理機,斷斷續續打至粗粒狀,加入椰子油,用手抓均勻,取出餅底餡放入模具,壓緊實,放入冰箱冷藏)
  3. In the same food processor or high-powered blender (no need to wash between - I used my Vitamix, but most powerful blenders should do the job), combine all of the filling ingredients except for the freeze dried blueberries and blend for about 2 minutes, or until the mixture is silky smooth and creamy. Scrape down the sides as necessary. You may need to add a bit more coconut milk or lemon juice to get it to blend smoothly if your blender isn’t super high-powered.(使用 Vitamix 以高速攪拌所有餡料,約需 2 分鐘,呈現非常綿密細緻的狀態)
  4. Once it’s smooth, taste the mixture and adjust the sweetness/tartness/spice levels, if desired.(調整口味)
  5. Pour ⅔ of the filling into the prepared pan over the pecan crust. Smooth out the top and tap the pan hard against the counter a few times to release any air bubbles. Place in the freezer.(取出模具,倒入 2/3 餡料,輕敲出氣泡,放入冷凍)
  6. Add the freeze dried blueberries to the remaining batter and blend to incorporate. Spread over the plain layer. Return to the freezer.(剩下的餡料加入冷凍藍莓,打至綿密狀,取出模具,倒入餡料,再放回冷凍)
  7. Rinse out the blender, and add the fresh blueberries, lemon juice and chia seeds to it. Blend until smooth, and then pour over the other layers.(沖洗攪拌杯,放入第三層的餡料,攪拌至滑順狀,取出模具,倒入餡料,再放入冷凍)
  8. Place in the freezer to set for at least 3 hours or until completely firm before slicing and serving. I recommend running your knife under hot water to warm it up before cutting the cheesecake with the still-hot (dried) knife.(最少冷凍 3 小時)
  9. Serve frozen or let them thaw at room temperature for 10-15 minutes before serving. Store in the freezer for up to 2 weeks.(回溫 10~15 分鐘再享用)
Notes
You can also cover the cashews in very hot/boiling water and let them sit for about an hour if you want to speed up the process - it won't be quite as creamy, but it will do the trick!


2017年8月13日 星期日

Avocado and Lime Cheesecake

這次的酪梨生乳酪蛋糕參考了 Hemsleyandhemsley.com 和 Bakerita.com

這次的份量很少,用小小 4 吋活動圓模來做。


 【餅底】 (4吋活動圓模)

  1. 1/4 cup raw pecans (胡桃)
  2. 1/4 cup almond flour (杏仁粉)
  3. 10g cranberry(蔓越莓)
  4. 1 tablespoons coconut oil (椰子油)
  5. 1/2 teaspoon cinnamon (肉桂粉)
  6. 1/8 teaspoon kosher salt (細鹽)


【餡料】
  1. 酪梨:140
  2. 檸檬汁:30g
  3. 椰子油:45g
  4. 蜂蜜:50g


以下資料取自: hemsleyandhemsley.com

For the filling:
560g (1lb 2½oz) avocado flesh (from approx 5 medium-large avocados) 
(酪梨 560g)
200ml (7fl oz) lime juice (roughly 8 to 10 limes) (檸檬汁 200ml)
175ml (6fl oz) coconut oil, melted and at room temperature (椰子油 175ml)
1 tsp lime zest (檸檬皮絲 1t)
190g (6¾oz) honey (蜂蜜 190g)

【作法】
  • Preheat the oven to 150°C/300°F/gas mark 2.(烤箱預熱至 150 度)
  • Place the pecans and desiccated coconut on a lined baking-tray lined. Place in the oven for seven to eight minutes, until toasted. (胡桃與椰絲一起鋪在烤盤上,150 度烘烤 7~8 分鐘左右)
  • Transfer the pecans to a food processor and add the rest of the base ingredients. Blend until the mixture is crumbly (don’t let it go completely smooth) and holds together when pinched. (把餅底材料放入食物調理機攪辦至有碎粒,有一點黏在一起)
  • Line the base and sides of an 18cm (7in) round cake tin with baking-paper and tip in the base mixture. Press this down firmly and evenly with the back of a spoon, ensuring it is neat and flat where it meets the tin. Transfer the tin to the fridge while you prepare the filling.(模具底層與周圍鋪上烘培紙,把餅底混合物鋪在底層,壓平,放入冰箱冷藏,然後準備餡料)
  • Place all of the ingredients for the filling into the food processor and blend until the mixture is completely smooth and silky. Check for taste – add more lime juice, zest or honey according to preference, but it’s best to keep this deliciously tangy.(將所有餡料放入食物調理機攪辦至綿密,可用蜂蜜和檸檬汁調整至滿意的口味)
  • Remove the cake tin from the fridge and pour the filling over the base. Cover the tin, using a plate or clingfilm, and return it to the fridge for a few hours or overnight.(取出冷藏的模具,把餡料倒入,蓋上一個盤子,再放入冰箱冷藏數小時或隔夜)
  • To serve, run a knife between the tin and the cake and carefully push the base up from the bottom. Transfer to a plate and serve immediately.(食用前可磨入巧克力絲,及用刀片刮入巧克力薄片,即時享用)


生乳酪蛋糕手札 Raw Cheesecake Notes

從網站

〔http://www.bonappetit.com/entertaining-style/trends-news/article/raw-vegan-cashew-cheesecake〕看到:"Raw Cheesecake Is Neither Cheese nor Cake, But You Want It Anyway"

才知道之前做的乳酪蛋糕只能說是冷凍的乳酪蛋糕。

Cheesecake 只是一個說明蛋糕體的名詞,有綿密的組織和口感。而 Raw cheesecake 則沒有 cheese 也不是蛋糕。

Raw Cheesecake 重點:
  1. 以生腰果 (Cashew) 取代 奶油 (Cream)。泡水 8 小時後使用,會使材料變濃稠。
  2. 以椰子油 (Coconut Oil) 取代蛋的乳化角色。另可加入椰奶 Coconut Milk 使口感更綿密。秘密武器是:Coconut Butter,可使冷凍後的 cheesecake 在室溫下不會軟化 。
  3. 不用糖,改用蜂蜜、楓糖等。
  4. 要有好吃的餅底。

找到一個網站有不錯的健康配方:
以下內容取自:Bakerita.com


No-Bake Layered Blueberry Cheesecake (Gluten Free, Paleo + Vegan)


Prep time
Total time
Author: 
Serves: 8 slices
Ingredients
For the crust
  • ½ cup raw pecans (胡桃)
  • ½ cup almond flour (杏仁粉)
  • 2 pitted dates (黑棗)
  • 2 tablespoons coconut oil (椰子油)
  • 1 teaspoon cinnamon (肉桂粉)
  • ¼ teaspoon kosher salt (細鹽)
For the cheesecake
  • 2 cups raw cashews, soaked in cold water for at least four hours or preferably overnight (see Notes)
  • ½ cup canned coconut milk, shaken (椰奶)
  • ¼ cup coconut oil, melted and cooled (use refined coconut oil if you want no coconut flavor) (椰子油)
  • ⅓ cup pure maple syrup (楓糖)
  • 2 tablespoons fresh lemon juice (檸檬汁)
  • 1 tablespoon vanilla extract or ½ teaspoon vanilla bean powder (香草精)
  • ¼ cup freeze-dried blueberries (冷凍藍莓)
For the blueberry layer
  • 1 cup fresh or frozen blueberries (thawed, if frozen)
  • 1 tablespoon fresh lemon juice
  • 1 tablespoon chia seeds
Directions

  1. Grease a 6” springform pan with coconut oil, or line an 6” cake pan with strips of parchment paper for easy removal, and grease well with coconut oil. Set aside.
  2. Add the pecans, almond flour, pitted dates, coconut oil, cinnamon and salt to a food processor or high-powered blender and pulverize until it comes together into a sort of sticky dough, with small pecan bits remaining. Don’t over process, or it’ll turn into nut butter! Press the pecan date dough evenly along the bottom of the prepared pan.
  3. In the same food processor or high-powered blender (no need to wash between - I used my Vitamix, but most powerful blenders should do the job), combine all of the filling ingredients except for the freeze dried blueberries and blend for about 2 minutes, or until the mixture is silky smooth and creamy. Scrape down the sides as necessary. You may need to add a bit more coconut milk or lemon juice to get it to blend smoothly if your blender isn’t super high-powered.
  4. Once it’s smooth, taste the mixture and adjust the sweetness/tartness/spice levels, if desired.
  5. Pour ⅔ of the filling into the prepared pan over the pecan crust. Smooth out the top and tap the pan hard against the counter a few times to release any air bubbles. Place in the freezer.
  6. Add the freeze dried blueberries to the remaining batter and blend to incorporate. Spread over the plain layer. Return to the freezer.
  7. Rinse out the blender, and add the fresh blueberries, lemon juice and chia seeds to it. Blend until smooth, and then pour over the other layers.
  8. Place in the freezer to set for at least 3 hours or until completely firm before slicing and serving. I recommend running your knife under hot water to warm it up before cutting the cheesecake with the still-hot (dried) knife.
  9. Serve frozen or let them thaw at room temperature for 10-15 minutes before serving. Store in the freezer for up to 2 weeks.
Notes
You can also cover the cashews in very hot/boiling water and let them sit for about an hour if you want to speed up the process - it won't be quite as creamy, but it will do the trick!

2017年8月12日 星期六

莓果乳酪蛋糕


Costco 的冷凍莓果真的很不錯!從其他網站買的莓果品質不佳。

【材料】
【餅底】7 吋圓模
  1. 消化餅乾:4 片
  2. 蔓越莓乾:18g
  3. 無鹽奶油:18g
  • 作法:
  1. 用食物調理機打碎消化餅乾和蔓越莓。
  2. 融化奶油。
  3. 加入打碎的餅乾和蔓越莓乾,搓揉均勻。
  4. 平鋪在模具底層,用力壓緊。
  5. 放入冰箱冷藏。

【餡料】
  1. Philadelphia Cream Cheese:250g
  2. 無鹽奶油:20g(也可用椰子油代替)
  3. 檸檬汁:30g
  4. 蜂蜜:100g
  5. 原味優格:100g
  6. 冷凍藍莓:5 顆
  7. 冷凍草莓:2 
  8. 橙酒:1T
  9. 打發鮮奶油:小包裝1/2

  • 作法:
  1. 所有材料放入攪拌缸中,用 hand blender 攪拌至柔順均勻。
  2. 試味道調整材料至滿意,然後再拌入打發的鮮奶油,攪拌均勻。
  3. 從冰箱取出模具,將餡料倒入。
  4. 先冷凍 30 分鐘後,裝飾表面。
  5. 再放入冷凍至少四小時。 


2017年8月9日 星期三

蜂蜜檸檬乳酪蛋糕


這次的生乳酪蛋糕加了 3T 的椰子油,沒有椰子味,凝固得比較好。
餅底加了一些糖漬橘皮丁,再鋪上一層糖漬橘皮丁,可以中和一下酸酸的餡料。

參考之前作法:
【餅底】7 吋活動圓模
(底部與周邊塗上薄薄奶油,底部放烤盤紙,周圍可圍上蛋糕圍邊)

1 消化餅乾:5 片
2 蔓越莓乾:20g
3 無鹽奶油:20g(融化)
作法:
1 用食物調理機打碎消化餅乾和蔓越莓乾。
2 融化奶油。
3 將融化的奶油加入打碎的餅乾和蔓越莓乾,攪拌均勻。
4 平鋪在模具底層,用力壓緊。
5 放入冰箱冷藏。


【餡料】
1 Cream Cheese:250g
2 無鹽奶油:20g
3 檸檬汁:30g
4 蜂蜜:90g
5 原味優格:50g
6 檸檬皮絲:2t
7 橙酒:1T
作法:
1 所有材料放入攪拌缸中,用 hand blender 攪拌至柔順均勻。
2 試味道調整材料至滿意。
3 取出模具,將餡料倒入。
4 放入冷凍至少四小時。 


黑麥汁桂圓鄉村麵包


  • 這次的黑麥汁麵包加入了酒漬桂圓,液體加量後組織的洞口就會變大。第一次發酵放在冰箱裡約五小時,取出後回溫約一小時,再塑型放入籐籃。

  • 第二次發酵約一小時,約膨脹至籐籃的八分滿,開始預熱烤箱至 210 度C,Miele 6260 加濕功能,1 次,烤了 20 分鐘,中途要蓋上鋁箔紙防止上色過快。


2017年8月3日 星期四

咖啡輕乳酪 ii

冷藏後表面的裂紋就不明顯了。
不過蛋白霜的狀態也會有影響,和好的蛋糕糊如果泡泡
多,大概成功率也不高了。


剛脫模的樣子,表面有些裂紋。

【蛋黃糊】7吋三能活動圓模,三顆蛋,模具塗上薄薄奶油

  1. Cream Cheese:110g
  2. 無鹽奶油:24g
  3. 咖啡:55g
  4. Coffee Syrup:20g
  5. 蛋黃:3 個
  6. 低粉:16g
  7. 咖啡粉:5g
  8. 玉米粉:10g

{How To}
  1. 隔水加熱融化 cream cheese,以打蛋器攪拌至乳霜狀。
  2. 加入奶油,繼續攪拌均勻。
  3. 加入咖啡、咖啡糖漿,繼續攪拌均勻。
  4. 蛋黃一顆一顆加入,每加入一顆攪拌均勻。
  5. 玉米粉+低粉+咖啡粉過篩,加入蛋黃糊中,攪拌至無粉粒。 


【蛋白霜】可把全部糖放在這部分,也可分半至蛋黃糊中,只是加入糖的 cream cheese 不好攪拌均勻,糖份多的蛋白霜比較穩定。
  1. 蛋白:3 個
  2. 海藻糖:60g

{How To} 打到七分發。KA 5Q 抬頭式攪拌機,速度 4。
  1. 第一分鐘,打出粗泡,加入1/3 糖。
  2. 大約第二分鐘,再加入 1/3 糖。
  3. 大約第三分鐘,再加入剩下的糖。 
  4. 這次共攪拌 7 分鐘,蛋白霜呈不穩定的彎嘴狀。

【混合】
  1. 把 1/3 蛋白霜加入蛋黃糊,輕輕翻拌均勻。
  2. 再加入 1/3 蛋白霜進去蛋黃糊中,輕輕翻拌均勻。
  3. 再加入剩下的蛋白霜進去蛋黃糊中,輕輕翻拌均勻。
  4. 入模,輕震出氣泡。


【烤程】Miele 6260,淺烤盤+深烤盤置於層一,烤肉架置於層二,上下火功能預熱至 195 度C。
  1. 放入蛋糕糊七吋圓模於烤肉架上,深烤盤加入近兩杯 800cc 的冷水,外加一些冰塊。
  2. 蓋上烤箱門,降溫至 165 度C,烤 17 分鐘。
  3. 降溫至 125 度C,先設定 70 分鐘,另外加入冷水約 400cc。
  4. 蛋糕表面有彈性沒有沙沙聲即烤好。烤好打開烤箱,把烤肉架往上移,蛋糕放涼 10 分鐘即可脫模,烤箱不用關。


Monet to Matisse: Defying Tradition_Publ.p54

  Frederick Frary Fursman 弗雷德里克・弗雷里・弗斯曼 In the Garden《花園裡》 1909,Chicago, Illinois 芝加哥,伊利諾州 oil on canvas|油彩、畫布 81.0 × 65.5 cm ___________...